Tuesday, April 26, 2011

Don't Call It A Cupcake

Little (or widely) known fact: I mother-fucking hate cupcakes. It's not necessarily Cupcake's fault, but they are so damn trendy and so damn pastel and so damn "feminine" that they fill me with rage and make me want to puke. Preferably on a rainbow or a kitten or something that's also supposed to be adorable and marketed to women.

That said, I haven't had my period in something like 6 or 7 weeks and have been exceptionally moody. (No worries, there is no biological way for me to be preggers.) After a heaping bowl of pasta for dinner and several ounces of El Rey 41% discos caoba (milk chocolate discs) for snack, I decided to pour myself a fishbowl of bourbon and ginger-ale and make some of these small, muffin-sized cakes from (where else?) SmittenKitchen.
Dark Chocolate Souffles with White Chocolate Mint Whipped Cream
Adapted from SmittenKitchen.

2 oz. white chocolate
3 oz. heavy cream
1/8 tsp peppermint extract

4 oz. bittersweet and/or semisweet chocolate
6 tbsp butter
1/4 to 1/2 tsp instant espresso or coffee powder
3 large eggs, separated
6 tbsp sugar, separated
 1/4 tsp salt

1. Place white chocolate in a small bowl (it should be able to hold at least 3 cups, though); if using chips you can use them as they are, if not, make sure you finely chop the chocolate first. Place cream in small saucepan on the stove and bring to a simmer. Pour cream over chocolate and wait 1 minute (or longer) for chocolate to melt. Whisk. Add peppermint extract. Whisk again until well combined. Place a piece of plastic wrap on the surface of the mixture and place in the refrigerator (~2 hours) or freezer (~1 hour) until well chilled.

2. Preheat your oven to 350 F and place muffin liners in standard-sized muffin pan.

3. Place butter in small to medium saucepan. Once it has melted enough to form a layer at the bottom, add dry espresso or coffee powder and chocolate (chopped or broken up). Stir briefly until butter is melted and chocolate is almost all melted; remove from heat. Stir occasionally until chocolate is totally melted but do not burn the chocolate. If you do, you'll just have to start over again.

4. Separate eggs into two medium bowls. Add 3 tbsp sugar to the egg yolks and beat with an electric mixture until pale yellow and quite thick (about 3 minutes). Add chocolate mixture and vanilla to yolks and stir until just combined.

5. Beat egg whites with clean, dry beaters (I just rinsed mine and paper-toweled them dry) until soft peaks form. Add remaining sugar to egg whites along with the salt. Beat until medium-firm peaks form. Fold egg white mixture into egg yolk/chocolate mixture in three parts. If you're not sure how to fold, leave a comment and I'll explain it.
Firm Peaks
Soft Peaks


6. Add souffle batter to muffin liners evenly across all 12 of them; this should leave them filled about 4/5 of the way to the top. Bake for 15-20 minutes or until a tester comes out with moist crumbs attached.

7. Cool souffles on a cooling rack. They will be falling by the time you get them there and that's fine; in fact, it creates a handy indentation into which to set your whipped cream.

8. Once souffles are cooled, retrieve your chilled cream mixture. Using clean, dry beaters (rinsed and wiped, most likely), whip cream until it's the consistency of ... well ... whipped cream. If you over-whip you'll wind up with butter and while lord knows I'm not one to judge you if you put butter on your souffles, it is something to keep in mind.

9. Place a healthy dollop of whipped cream atop a souffle and scarf it down. I would save the souffles and the cream in separate containers unless you plan to serve them all at once--otherwise just top them as you plan to eat them.

Tips and Tricks
- This is super fast. Not a tip or a trick, but good to know.
- I mixed 2 oz. 70% dark chocolate and 2 oz. semisweet for this and it came out great, but you can stick to one or the other. Milk chocolate would be too sweet and not nearly rich enough.

Serving and Pricing info: Supposedly 12 servings, but I say you eat as many of these at a time as you like. I had all of the ingredients to this already in my kitchen so for me it was FREE, BITCHES.

How was it? Delicious. I've made these before and they never disappoint.

Monday, April 25, 2011

The First of Many Posts Encouraging Bacon

This past weekend I went to Philadelphia to visit my oldest and best-est friend Liz. She picked up a great cookbook at Terrain and we made a frittata inspired by one of its recipes. Delicious as it was, it still wasn't the enormous Amish cinnamon roll we had eaten Saturday morning (or the indescribably delicious Amish bacon we fried up to go with it).

Oh, also, sorry for the minimal pictures. After the vegetables started cooking I got super distracted with eating bacon and watching Downton Abbey.


Asparagus, Corn and Potato Frittata with Goat Cheese
Adapted from One of Liz's Cookbooks.

Butter (about 2 tbsp)
4-5 small red or yellow fingerling potatoes
1 shallot
1 bunch asparagus
2 ears of corn
4-5 green onions
10-12 eggs
5-7 oz. goat cheese
Salt
Pepper
Dill


1. Melt about 1 tbsp butter in a large, oven-proof sauce pan or skillet. Or, if you're me and Liz, skip the butter and cook up some nice, fatty bacon (no turkey or soy bacon); leave the grease in the pan and snack on the bacon as you proceed. Also, at this time, preheat your oven to Broil and move one oven rack up to only a few inches below the broiler.

2. Dice potatoes and mince shallots. Add potatoes to the buttered (or greased) pan and allow to cook for a bit. When they begin to color add the shallots. Salt and pepper to taste. Cook together until the potatoes are crispy on the outside but still soft on the inside (think home fries). If shallots begin to burn that's fine, just remove them from the pan.

3. Add green onions, corn, and asparagus to pan. Cook all vegetables together for 3-5 minutes; nothing should be burning, but everything should be well-heated and the flavors should be blended.

4. Remove vegetables from pan and into a large bowl. If there are burned bits stuck to the pan, clean it out by wiping down with a paper towel. Add beaten eggs to vegetables (I gave a range here because it will depend on how many veggies you end up using how much egg you'll need to hold it all together; we used 2 cups of egg whites for ours but Liz insists a yolk or two would have been a useful addition). Return mixture to buttered pan (break out the other tbsp here) and set on medium heat. Salt and pepper to taste. Dot chunks of goat cheese on top of the frittata and push down slightly so that they become incorporated.

5. Cook for at least 8 minutes or until the edges of the frittata begin to pull away from the pan. If it seems like the bottom may be cooking too quickly (though I'm not sure how you'd be able to tell) feel free to turn down the heat. Once the edges have puffed out, remove pan from stove-top and transfer into oven. Allow frittata to continue to cook in the oven until desired doneness; the recipe we were using called for only a minute, but since we had increased the proportions of veggies and eggs, ours ended up needing to stay in for more like 6 minutes. The moral is, make sure you watch it and whenever it looks like it's done, then it's done. Ta-da!

Tips and Tricks
- This, like many cheaper, easier meals, is very open to interpretation. Nearly any spices + veggies + eggs = frittata goodness. Subbing out asparagus for broccoli or adding tomatoes or anything else that might be more in line with your tastes or what's available at the market is A-OK.
- Though we didn't do it here, a jalapeno might have been a nice addition.

Serving/Pricing info: Frankly, I have no idea. The recipe originally calls this a 4-serving dish, but depending on your appetite it could easily be 6 or even 8 servings. Also Liz bought the ingredients so I can't say for sure how much this ended up costing, but if you shop vegetables on special this could very well be under $3/serving.

How was it? Really, really good. We ended up eating ours rolled up inside fresh tortillas with chunky, spicy salsa but this is also great on its own.

Thursday, April 21, 2011

Vodka: Like You Needed A Reason

During an average week I cook once, maybe twice, for myself and space it out at least 4 days in between sessions because I expect that what I'm making will sustain me for the next 5-7 days as a main course. Last night Mallory came over and I said I'd cook dinner ... despite just having cooked for myself 2 nights ago ... but it's all good. I got to make Penne a la Vodka and Vanilla-Scented Strawberries with Honey Cream (a word of warning: this needs to set for about 2 hours in the refrigerator before serving, so it might be a make-the-day-before thing).

As you may or may not but should know, Penne a la Vodka is so-named because there really is vodka in the sauce - a whole cup, to be exact. There is also cream. If somebody can come up with a better idea than carbs smothered in booze and cream, I'd just love to hear it.

Vanilla-Scented Strawberries with Honey Cream
Adapted from Cooking Light.
1/3 cup water
1/3 cup sugar
1/2 tsp (or so) vanilla extract
1/2 teaspoon unflavored gelatin
1 tbsp water
2 tbsp cornstarch
1/8 tsp salt
3 large egg yolks
1 cup 2% reduced-fat milk
6 oz. 2% plain Greek yogurt
2 cups quartered strawberries

1. Bring first three ingredients to a boil over medium heat; stir occasionally until the sugar dissolves then remove from heat. Let stand for 10 minutes and then chill in refrigerator.

2. In a small bowl, sprinkle gelatin over 1 tbsp water. You want the gelatin to dissolve and may have to wiggle it around a bit to get it there. This WILL turn into a block (are you surprised?) and that's fine, just leave it.

3. Mix honey, cornstarch, salt and egg yolks in medium bowl with a whisk until combined.

4. Heat milk over medium-high heat in a small, heavy saucepan to 180 F. If you still don't have a thermometer (honestly, 98% of the things I make never need it, it's just these two posts), watch the milk for small bubbles forming around the rim. You do not want to let it boil. This next part needs both hands: gently pour the milk into the honey-egg mixture in a slow stream while constantly whisking. If you don't, you'll end up with honeyed scrambled eggs. If that's what you were going for then God help you.

5. Return the milk-honey-egg mix to the saucepan and cook over medium heat, stirring constantly. After about two minutes the liquid will thicken and bubble a bit (not boiling, though) and you may think, as I did, "huh, that looks like yellow pudding." That's what you want. That means you're done. Remove from heat and add the gelatin mix/blob to this and stir well (the gelatin will incorporate because of the heat, just stir until you're sure it has). Pour it into a clean bowl (I just took a paper towel to the one the pre-cooked mixture had come from).  Stir it every so often for about 20 minutes - you want it to be cool but it won't be set.

6. Stir in yogurt. Depending on how you're serving this and to how many people, you have options here. According to the original recipe, you should spoon 1/4 cup of the yogurt-milk-honey-egg mix into 8 dessert cups or bowls, cover them each, and allow them to set in the fridge for at least 2 hours. I'm only serving 2 people tonight, so I'll make 2 serving and save myself some trouble by dumping the rest into a bowl and chilling it as one serving.

7. Top each serving with 1/4 cup strawberries (I wouldn't cut these until just before you're ready to serve) and drizzle with about 2 tbsp syrup.

Tips and Tricks
- This was actually supposed to be Lavender-Scented Strawberries with Honey Cream but my local chain grocer didn't have any dried lavender. It was a sad, sad day in the baking aisle. But, it goes to say that this can be Just About Anything You Like-Scented Strawberries with Honey Cream. I considered coriander and cinnamon as options before deciding vanilla would probably compliment the honey best but you go where your nose takes you. And then let me know how it turns out!
- If you need to speed this thing up because you're on a deadline or out of patience (or, like me, both), you can allow your servings to cool in the freezer instead of the fridge. It should only take about an hour, but be careful not to let it freeze! Once the water separates out into crystals the texture gets ... well, just don't do it.
- My syrup ran over the strawberries and pooled on top of the yogurt (as you can see). It's not super attractive so you may consider soaking the berries in the syrup for about an hour prior to serving if presentation is a concern of yours.

Servings and Pricing info: If you stick to the suggested 1/4 cup cream + 1/4 cup berries = 1 serving formula, this set me back $1.85/serving which really isn't bad. Granted, the berries where on special (2 for 1 pints), though I did also have to buy gelatin, milk and yogurt. Assuming you already have those things around (which you probably should) this becomes much cheaper.

How was it? I liked it fine but it isn't going to into my Dessert Hall of Fame. Since I'd just had a ton of pasta and was more full than not, I was glad I hadn't decided to make something richer. I'm not usually a huge fan of these sorts of desserts though so I don't think anything went horribly awry. Good for at the end of a heavy meal, especially when it's hot out. Could also double as breakfast.

Penne a la Vodka
Adapted from Rachel Ray* via Smitten Kitchen.

1 tbsp or so extra-virgin olive oil
1 tbsp butter
2 cloves garlic, minced
2 shallots, minced
1 cup vodka
1 cup chicken stock
1 32 oz. can crushed tomatoes
16 oz penne rigate
1/2 cup heavy cream
20 leaves fresh basil, shredded or torn
Salt
Pepper

1. Heat a large, heavy skillet over medium heat. Add first four ingredients. Gentle saute for 3-5 minutes.

2. Add vodka (!) and allow it to reduce by half (2-3 minutes). Add chicken stock and tomatoes. When sauce begins to bubble, reduce heat so that it continues to simmer. Season to taste with salt and pepper. Either keep the heat on very low and continue to watch the sauce, stirring sporadically, or just turn the burner off while you put the pasta on to cook. (If this needs clarification: put enough water in a pot to cover the amount of pasta you'll be adding. Once the water boils, add the pasta. Cook according to the time on the box. Sheesh.)

3. While the pasta is cooking, prepare any sides you might want (I sauteed some asparagus - left over from Monday's flatbread - in olive oil but you do you, boo). If you don't want sides, use this time for person reflection, meditation, a quickie, to fold your laundry, or anything else that comes to mind and takes less than 13 minutes.

4. When pasta is finished, drain and place drained noodles into a bowl. Add cream to sauce and put back onto heat (or just add cream if you kept the skillet on the burner) and stir until combined. If you're reheating the sauce, bring it to a simmer. If it's already simmering, poor it over the pasta. Add torn basil leaves.


Tips and Tricks
- You may find, as I did, that your sauce is a little acidic. That is quickly and easily remedied with a little bit of sugar (not sugar substitute). I didn't measure but about a half tablespoon should do the trick; just stir it into the sauce while it's still on the burner.
- As always, add cheese when you're finished if you want it. A sprinkling of Parm-Reg did me well, but experimenting with other hard Italian cheeses never hurt anyone.
* I hate Rachel Ray. I think she is a ridiculous fraud as a chef, and her personality is so grating I'd gladly throw her into a wood chipper, given the opportunity. However, her name is here now because SmittenKitchen adapted this recipe from her and I adore SmittenKitchen. Most things I make and end up loving come from her and if I wasn't careful, my blog would basically be a copy-and-paste mock-up of her's.

Serving and Pricing info: I don't know what the servings on this are supposed to be but I can tell you if I were to guess as to the quantity of food I ended up with, I'd say it's somewhere in the neighborhood of a metric shit-ton. It will easily last me 6 servings, though I can also see lasting to 8, so I'll give the numbers for both. Taking into account that I had to buy vodka, basil, cream, penne, and crushed tomatoes, this ended up costing me between $2-$3/serving depending on how long I can make it last. Worth every penny, and probably several more.

How was it? Awesome. Just awesome.

Monday, April 18, 2011

In Protest of Unleavened Bread

Realizing I had one 1/4 oz. packet of yeast left (roughly 2.25 teaspoons) and remembering that I hate having to deal with unsealed yeast, I found two recipes that used it up for me: Pancetta, Mozzarella, and Asparagus Flatbread and Maple-Glazed Donutholes.

My trip to the grocery store left me feeling like an idiot after roaming the produce section for a solid 10 minutes, unable to find the asparagus. It was exactly where it should have been but, because it was ass-side facing out, I missed it until my forth pass past the greens area. Of course. Luckily, it was on special so I saved a dollar or so and felt like slightly less of a failure.

Maple-Glazed Donutholes
Adapted from Cooking Light.

6 tablespoons warm water (100-110 F)
1/4 cup granulated sugar
1 1/8 teaspoons dry yeast
6.75 oz. all-purpose flour (about 1 1/2 cups*), divided
1/8 tsp salt
3 tbsp sour cream*
1 large egg, lightly beaten
Cooking spray
6 cups peanut oil
1 1/2 cups powdered sugar
2 tbsp maple syrup, preferably the real stuff
2 tbsp water

1. Combine first three ingredients in a large-ish bowl. I happen to have a candy thermometer so I knew what temperature my water was, but about 16 seconds in the microwave (for room temperature water) will be in the right neighborhood. Weigh 5.65 oz flour (if you have the scale) or lightly fill dry measuring cups with 1 1/4 cups flour. Add salt to the flour. Add sour cream* (I used greek yogurt here because it's what I had on hand and it has the same texture and nearly the same taste as sour cream) and egg to yeast mixture. Stir until smooth. Sift flour/salt into yeast mixture. Stir until a moist ball forms.
This is about what your finished, pre-risen dough should look like.

2. Turn your dough ball out onto a lightly floured work surface. If yours was like mine, it's still super wet and sticky and unruly. The recipe recommends keeping 1/4 cup flour* nearby and adding it, one tablespoon at a time, to your dough until the dough stops sticking to your hands. This is going to vary based on your humidity and altitude and such, but in my case I ended up using a good 1/4 cup more flour than was directed. Knead the dough until it's elastic, smooth, and no longer clings desperately to your hands. Shape it into a ball and place in a clean, large-ish bowl coated with cooking spray. Cover tightly with plastic wrap and let sit in a warm, dry, draft-free place. When it has doubled in size (about an hour), it's ready for the next step.

3. Punch the dough down (seriously, punch it). Now you need to divide it into donuthole-sized pieces. Begin by laying out a sheet of plastic wrap and spraying it with your cooking spray. The easiest way for me to do it was to continue half the dough until I reached a point where I had 32 similarly sized balls rolled out. If you want to just rip pieces off and eye-ball it, that also works. When all of your 'holes are set, place another sprayed piece of plastic wrap on them and let them rise again for another half hour (or more - the thing about rising is that it's pretty difficult to let something rise for too long as long as you're being reasonable about it; I wouldn't recommend leaving dough on your counter for more than 48 hours ever).

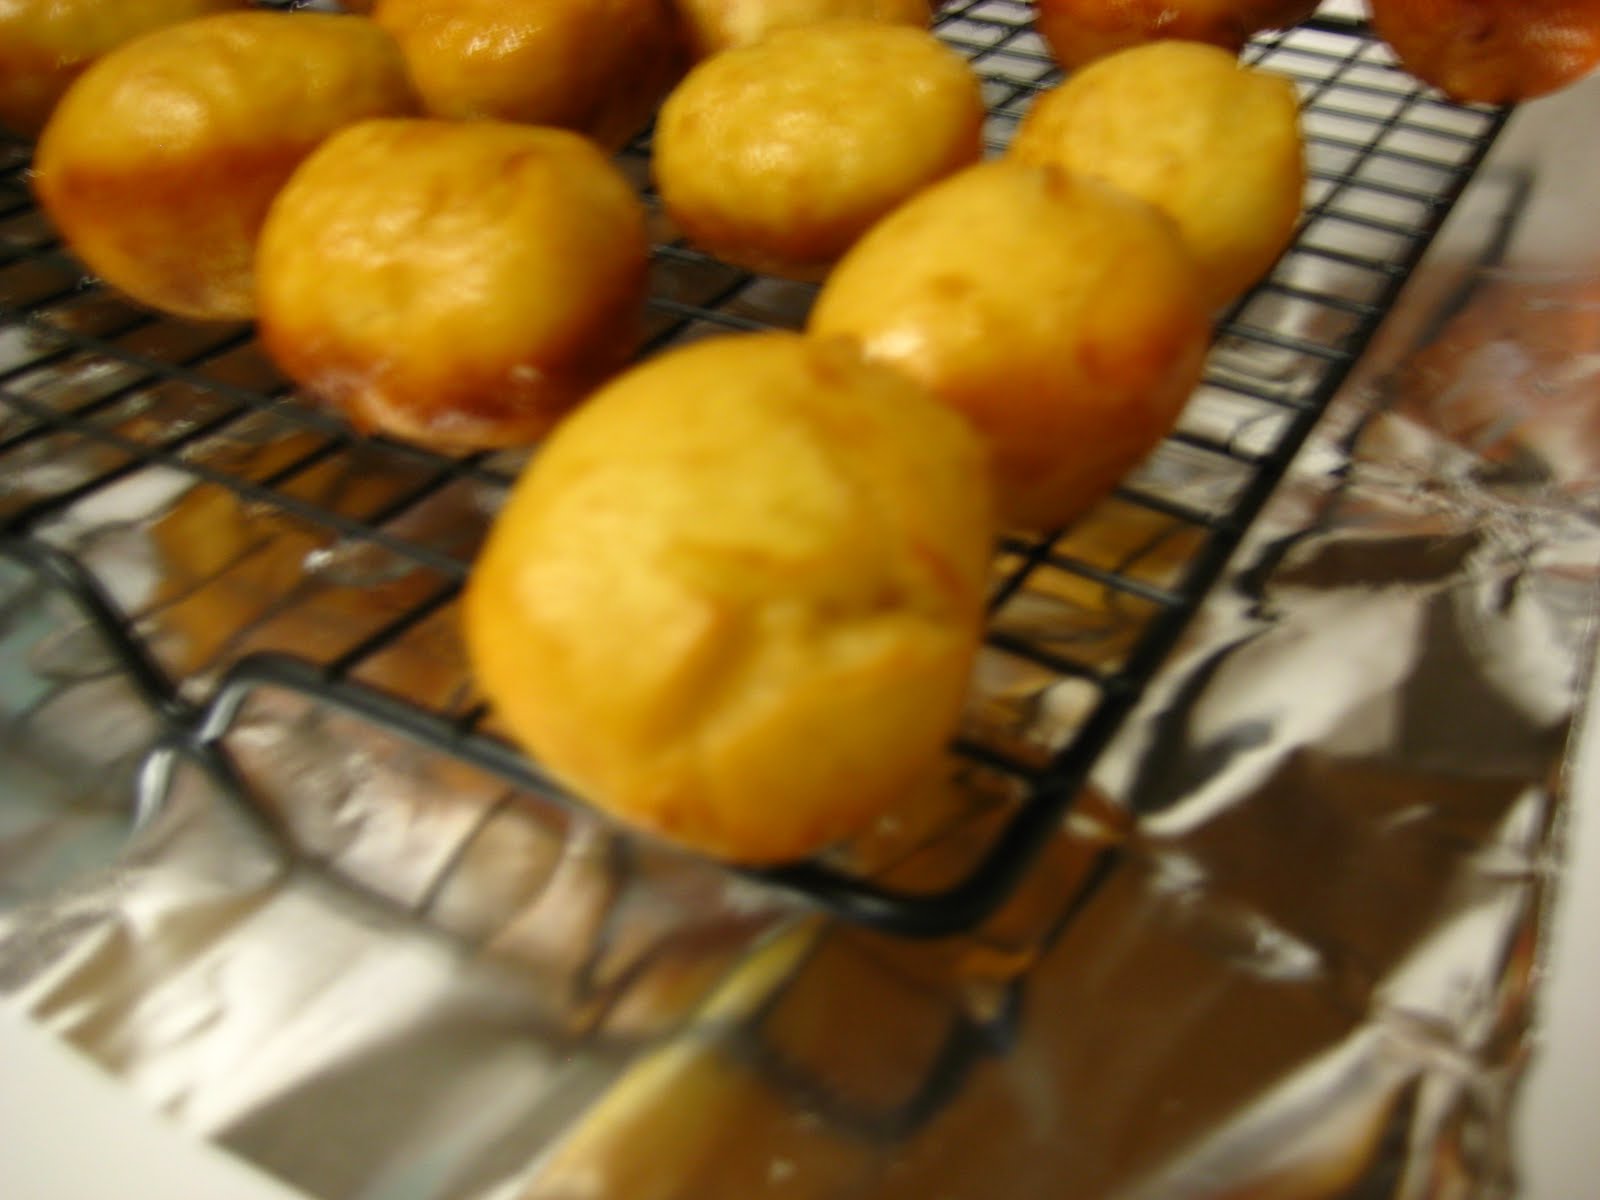
My frying skills left something to be desired.
4. Break out that crazy amount of peanut oil and fill a dutch oven with it. If you don't have a dutch oven (and I don't) you can use any large, heavy pot or pan so long as the sides are raised well above the level of the oil. You're going to heat this to 375 (you should probably use a thermometer for this - you can get the cheap one I use at Target for under $10, I believe - but if you can't, allow the oil to boil for a good 10 minutes and then drop a donuthole in. If bubbles immediately form around it, but it doesn't immediately change color, that should work. If no bubbles, turn up the heat. If quick color change, turn down the heat.) You can fry as many as you feel like you can keep an eye on at once - my golden number seemed to be six. Don't feel bad if they don't look exactly like donutholes or even if they're mostly round; no matter how they look crispy outside + soft inside + sugary coating = delicious.


But they steadily improved. See? An evenly fried dough ball at last.
6. Speaking of sugary coating: mix remaining ingredients together until smooth.

5. As you take the holes out of the oil, place them on a slotted rack to cool and drain (I put a piece of foil under mine to cut down on mess and the risk of my counters melting). Once drained, dip donutholes in aforementioned sugary coating to ... well ... coat. Put them back on the cooling rack so the coating can drip-dry. You now have donutholes! Celebrate! And if that celebration is you eating all of them in one sitting, I won't judge.

Tips and Tricks
- The oil really does need to be hot enough. If you're not sure, err on the side of hotter. You want the outside to be crispy and truth be told, mine could have used more crisp. Still tasty, just doughier.
- If you don't like maple or just aren't in the mood for it, you can also roll these guys around in granulated sugar, some cinnamon and sugar mix, straight up powdered sugar, or experiment with different liquids in the powdered sugar. Just make sure you use enough liquid (ie: don't just cut out 2 tbsp maple, replace with 2 tbsp water if you want plain glaze).
- To save money, save the oil! Mine is still totally clear and gunk free and if the same ends up being true for you, invest in some sort of container that you feel comfortable storing it in. It keeps for ages and is a great excuse to make more fried foods.

Serving/Pricing info: The original recipe claims that you can make 36 donutholes and that three comprise a serving. I made 32 holes and using a box of Girl Scout Cookies as my guide I've decided that for this post, a serving is 2 donutholes - don't roll your eyes at me, I just ate 5 of them. I know 2 is unreasonable. Since I had everything in my pantry except for the peanut oil and the maple syrup, this came out to just under $1/serving for me.

Pancetta, Mozzarella, and Asparagus Flatbread
Also adapted from Cooking Light.

 1/2 cup warm water (100-110 F)
1 teaspoon dry yeast
6.7 oz. all-purpose flour (about 1 1/2 cups), divided
1/2 tsp sea salt*
Cooking spray
1 tsp dried thyme
2 oz. pancetta, finely chopped
1 garlic clove, minced
1/8 fresh ground black pepper
1 tablespoon cornmeal
1 cup very thinly vertically-sliced asparagus
1/4 cup shredded part-skim mozzarella cheese*
1/4 cup grated Parmigiano-Reggiano cheese

1. Combine water and yeast in a large bowl and let stand five minutes. If you're guessing on the water temp, room temperature water in the microwave for 23 seconds worked for me. Weigh 5.6 oz flour (if you have the scale) or lightly fill dry measuring cups with 1 1/4 cups flour. Add salt to the flour and add them both to the yeast. Stir until blended and then turn out onto a lightly floured work surface. Knead dough until smooth, elastic, and barely sticky, adding the remaining 1/4 cup flour as you need. (This time it actually was the correct amount of flour for me.)
mmm ... pancetta

2. Coat a large, clean bowl with cooking spray and place the dough inside. Cover with plastic wrap and let rise until doubled, about 45 minutes.

3. In a small skillet over medium heat, combine the thyme, pancetta and garlic. Cook until the pancetta is crispy (about 6 min for me, maybe less for you) and then remove from heat and add the pepper.

4. Preheat oven to 475 F. Place a baking sheet in the oven and it warm up for at least 15 minutes.

5. Punch your dough down. They place it on a lightly floured work surface and spread out to, ideally, a 10-inch circle. Now, if you honestly believe I was able to stretch this risen dough out that wide and in the shape of a circle, you have way too much faith in me and need to adjust your expectations. Once expectations are adjusted, try your best. It will likely be misshapen. It will likely tear while you wrestle it into shape. If it does tear, roll it back into a ball and go again. If it's not 10 inches, it's not 10 inches. Relax. Move on. Sprinkle the now-heated baking pan with your cornmeal. Place the dough on the cornmeal and adjust it back into shape as needed.

6. Spread the pancetta mixture evenly over the dough. Spread asparagus evenly over the pancetta layer, and then mozzarella* (use the full fat stuff if you like) evenly over the asparagus layer. Bake for 10 or so minutes - you just want the crust to be golden. After you remove it from the oven, sprinkle with Parmigiano-Reggiano. Cut. Serve. Yum.

Tips and Tricks
- To get those thin asparagus strips you can use a mandolin (which I don't have) or a potato peeler (which is what I used). It took a surprisingly small number of asparagus spears to reach a cup-full (about 6 or 7) but they baked down so use as many as you like.
- Baking is pretty much chemistry and you shouldn't fuck with the measurements once said measurements have been proven to work. Cooking, however, is largely a free-for-all. You want more veggies? Throw more veggies on. You think salami would be better than pancetta? Do it. And so on. I happen to think this recipe is awesome the way it is and am physically restraining myself so I don't inadvertently eat the entire thing tonight.
- The thinner you manage to make the dough, the crispier you will be able to make the crust without burning the toppings. I ended up with a thicker crust than I would have liked but it wasn't enough of a hassle for me to try to get things thinner. It's about picking your battles.
- A note about mozzarella: I love love love fresh mozzarella but, alas, this is not the place for it. The pre-shredded crap just melts better and more evenly. If you want to use fresh, that's your call. But this is one of the few times I'll actually encourage you to go for something pre-packaged.

Serving/Pricing info: I don't know if it's my source of if it's all recipes, but these serving sizes are being grossly underestimated. Supposedly you get 8 servings out of this. I guess if it's an appetizer, sure. But this was my dinner and I shoved a quarter of it in my mouth without blinking. By that measurement, this ended up costing me $4.75/serving. If you need to make it cheaper, go to Whole Foods and just buy your spices in bulk so you're only paying a few cents for what you'll actually use that night. Also, I bought 4 oz. of pancetta because - as discussed - I'm a fat kid. Buying less obviously costs less ... but then you don't have leftover pancetta ...

Gotta Be Startin' Something

Hello and welcome and thank you. Time is valuable and the fact that you're spending a little of yours here brings me some warm fuzzies. Sometimes I am a sap - you will come to love this as it provides nice contrast to when I am sometimes a wretched bitch.

Down to business: I am broke. I am busy. I am fairly certain this is something I share with most of you and if not, well, good for you. My hope is to provide some tried and tested recipes so you can avoid wasting your time on those that are doomed from the beginning. Additionally, with my handy math skills, I will be providing a price-per-serving tidbit at the end of each recipe. This will be based on things I assume you've bought just for that recipe; there are some things you just need to have in your kitchen. You can spend as much or as little as you want on them so I won't list prices here, just suggestions for what you might want to keep in mind while shopping.

  • Flour - Good all-purpose flour lives up to its name whether you're using a tablespoon to thicken a sauce or an entire bag for a marathon cookie-baking session. My preference is for the unbleached variety because there's absolutely no reason you need to bleach flour. Yes, it'll be whiter in the bag. But no, it won't actually yield a noticeably lighter-colored result. You may also want to invest in cake flour if cakes are your thing, but I usually buy that on an as-needed basis.
  • Butter - Unsalted for baking, salted for eating (or maybe that's just me because salted butter is delicious). Obviously the unsalted variety will be more generally useful since you can always add salt to a recipe.
  • Olive Oil - I cannot stress this enough: first cold press extra virgin. If ANY of those words are missing from the bottle, you don't want it. Granted, I'm a bit of an olive oil snob. My grandfather (a wonderful little Italian man who tells me things like crushing garlic with a knife blade is "too fancy" and then proceeds to smash the clove with the closest can of tomatoes) spent my entire childhood explaining olive oils to me and I assure you, it makes a difference. I don't believe it's much pricier than the other stuff but if it is and you need to save the few bucks, I understand. However, under no circumstances are you to purchase any of that "low-fat" or "light" oil. It's oil. Use it or don't use it, but don't be a pussy.
  • Canola or Vegetable Oil - Either way, you're good: they taste nearly identical. So identical that I couldn't even begin to explain what the difference is because I just don't know.
  • Vanilla Extract - NOT imitation vanilla extract - why would you do that to yourself? If this is another price thing, here's what you do: go to Central Market if you live in Texas (!) or another foodie-ish grocery store and find the giant bottle of Mexican vanilla extract. It is nearly a liter big and it retails for something like $8. I bought mine three years ago and still use it whenever I go home to visit my mom. You can also buy the super fancy 1 oz. bottle for $15 but then why are you here?
  • Spices -  Cinnamon, nutmeg, salt, pepper. Just do it.
  • Sugar - White sugar comes into play most often, but brown sugar is also well worth having around. If you're constantly wondering whether you need light or dark brown sugar, I can tell you that I pick the dark stuff. The only real difference is subtle and flavor-related with the dark brown being richer. If you're worried about the color of your finished project, stop. The difference in color (as it was with flour) will be undetectable. 
  • Eggs - I buy free-range brown eggs because I've watched Food, Inc. and read some Michael Pollan books and feel bad for the chickens. If budget is more important to you, by all means, buy the store-brand ones. (Once again, do not stress the color. Buy what makes you happier.)
  • Garlic - It's easy to forget (at least for me) on trips to the store that are specific for a recipe because it seems like such an everyday ingredient. Having it on hand makes everything easier and more flavorful. Plus it's super cheap.
That's all I have for now. This will not be a cheap shopping trip, but it will be worth it. You will see how much a jar of cinnamon costs and if you're like me, you'll consider breaking out into tears in the baking aisle. But you will thank yourself later because you won't have to buy another one for another two years. As I think of more essentials I'll post them but for now I'm late for a doc appointment (as usual).

Love & Spices,
K.